Saturday, January 31, 2015

Homemade Kombucha

Some of you may be thinking "What the heck is kombucha?!" Others may be avid drinkers of the tea but either way, today I am going to teach you how to brew your own! I have to admit, when I first got into kombucha, I was only able to drink the favored versions that you can buy in the stores.  The bottled "original" kombucha (without flavoring) nearly put hair on my chest… oh my word - it was like drinking vinegar! So I stayed far away from the original stuff and stuck to my old faithful favorite - Syndergy Guava Goodness  by GT's Kombucha!

I was literally drinking this stuff like it was going out of style… 5-7 bottles per week! My husband started to get into drinking it as well but at just under $4 per bottle (and nearly $45/week just for myself) we were like its nuts to spend $90/ week for both of us to drink this stuff - no matter how delicious and beneficial it is! Thats when I got the bright idea (sometimes I get these crazy ideas and everyone thinks I am nuts) to make my own!

So for those of you who have no idea what kombucha is, it is a fermented tea with a ton of goodness for your body. So as with anything that is not considered to be the "norm" there are just as many articles about the benefits as there are about the dangers or myths about the stuff. There have been articles that indicate health benefits of helping with building the immune system and improving digestive health because of the beneficial bacterias (think something similar to Kefir or yogurt), and even improving energy. And then there are they nay-sayers posing an opinion that it could be harmful, etc., etc., etc.

So for the purposes of CYA (covering your (my)  arse) I will tell you that this post is truly my opinion, based on my experiences, and you should make this recipe with caution and at your own discretion (blah blah blah). As for the health claims, there has not been been a lot of  hard core research on the topic so, if you are like me, you are going on the reputation that has been created by those who have been drinking the stuff for many many years and feel that there is a true benefit to your health by drinking it. 

Fermented tea? What the…? Well basically kombucha is created after you brew a very strong and sweet tea that sits at room temperature with a SCOBY (symbiotic culture of yeast and bacteria) that looks like what some say a mushroom or to me, a beige jellyfish! So for any of you who have taken microbiology or who know a thing or two about fermented foods (hello sauerkraut and wine) basically adding the bacteria and yeast colonies to a tea with high sugar allows the bacteria and yeast to feed off of the sugar and boom - fermentation occurs and you are left with this delicious tea - in a nut shell. If you leave it too long, you will end up with a sort of vinegar (yikes)! If you are really into the whole science thing then go read up on how fermentation occurs but if not, just go with what I said lol.

I have to tell you, I have been making this stuff for quite some time now and have given it to many people to taste (people who are avid drinkers) and they absolutely rave about this recipe which makes me feel good - tried and true.  My husband and mother,as well as myself drink it religoiusly so I make mine in big, BIG,  batches. 

If you are wondering what it tastes like, its hard to describe but its pretty much like a tea that is sorta sweet with a little tang and fizz at the same time. The homemade version is much more mild than the original store bought and is easier to ferment to your liking. 

So if you haven't ran away in pure terror by this point and you are like "heck yeah I wanna try this" here is how I brew mine. 

Remember I make mine in big batches (3 gallons at a time) so that it lasts me two weeks (the length of the fermentation process) and I continuously have a supply. For the purpose of this recipe I will give you the measurements for making 1 qt at a time, but my pictures are based off of how I brew mine in 1/2 gallon jars so don't get confused - use the measurements!

You will need:
  •  2 Black or green teabags (you can also use loose leaf tea if you wish - make sure either version of the tea is UNFLAVORED) I've used both types and we prefer the black tea over the green. 
  • 1/3 cup of sugar 
  • 1 qt of water
  • a SCOBY (you can buy one from a reputable source or get one from a friend)
  • 1/2 cup of starter liquid (comes with a scoby if you buy it, get some from a friend or use original flavor store bought kombucha)
  • paper coffee filter or cheese cloth
  • qt size mason jar 
  • qt size bottle for finished product (make sure it is plastic or glass - NO METAL)
  • rubber band
  • plastic funnel
  • wooden (or plastic) spoon
  • a sauce pot (big enough to boil a qt of water in)
To make:

Get a pot of water boiling and sterilize your mason jar for at least 10 minutes (super important)! In another pot, boil 1 qt of water.  If you are using a water filter that filters out chlorine then bring the water to a boil and turn off.  If using tap water, bring the water to a boil and boil for an addition 10 minutes once boiling.

Once your mason jar is sterilized, set it on a pot holder on your work surface and grab your teabags and sugar.


I make my kombucha using all organic ingredients - you can use regular ingredients if you like. So this is the tea that I use… its from Whole Foods. The reason that I love this tea, other than that it is priced well for organic tea, is that it comes in teabags that do not have a staple in them. Call me crazy but one of my biggest pet peeves is the staple that holds the string on - why do we need to have metal in our tea!? 


This is the sugar that I use- you can use regular white granulated sugar if you wish.  If using organic sugar, make sure it is not turbinato sugar!

So take your tea bags and plop them in your sterilized jar.  Next, pour in the sugar like this (remember  I have more ingredients in my jar because I am making a larger batch than the recipe calls for)

By this time your qt of water should be done boiling. Very carefully pour the water into the mason jar but do not fill it all the way to the top -you want to leave at least 1/2 cup of space at the top. On the mason jars, there is a line just before the top - thats a good place to stop filling. 

Now you are going to want to stir, stir, stir until all the sugar is dissolved. Once that happens, place the coffee filter (or cheese cloth) over the top and secure with a rubber band like this


Put the coffee filter on with the teabags still in the jar?!? Yes! You want them to steep in there until the tea cools to room temperature - like I said before, this is a strong, sweet tea in the beginning. 

So now you are going to let this cool until room temperature. On a nice day (not when it's freezing like it is here at the moment) I will put these outside on my front porch to cool. I will tell you that if you are going to cool these outside, make sure to use the coffee filter rather than the cheese cloth and make sure the rubber band is secure (you don't want little bugs to go into the tea- they will be highly attracted to it because of it's sweetness). Sometimes the cooling process takes hours so be patient. 

Other kombucha brewers add the teabags and sugar to the pot of boing water which is fine too.  The reason I don't make mine this way is because I found that it takes much, much longer to cool in the hot metal pot!

Ok so once your tea has cooled, take off the coffee filter, remove the teabags with a wooden spoon and add the starter liquid.


From this point forward - no metal, whatsoever, should touch the kombucha! This is super important so be mindful of what you are using!

Now you are going to want to grab your SCOBY and add it to the jar.  Once it's added it will probably float around near the top.  If it sinks, don't worry, that is fine too.

Now, put the coffee filter/ rubber band lid back on and  place in a warm area (out of direct sunlight) for 10-14 days (this will depend on the temperature of the room).

I usually line up all of my jars (6 1/2gallon jars at a time) on top of my refrigerator. Now while it is fermenting, I suggest tasting it at the 10 day mark to see if it is ready. A new baby SCOBY will be forming on the top of the jar so be careful not to disturb it too much.  Take a straw and put it into the top of the jar and slide it along the side, put your finger over the top of the straw to put some kombucha into the straw, and give it a taste. 

NOTE: you should not have anything that resembles mold forming. If you do, throw away your kombucha immediately. I have been making mine for quite some time and have never had this because I meticulously follow the steps as I am giving you.

If all is good, take a taste. When it is ready (usually about 14 days for me but quicker if the kitchen is hot) it should taste sort of sweet with a little zing of tartness.  If it is really sweet and tastes like sweet tea with no tartness, it is not ready. Let it keep fermenting and taste it daily!  If you let it go too long you will end up with vinegar!! Don't let it get to this point!

So when it is ready, you will have the old SCOBY you started the tea with (some people call this the "mother") and a new SCOBY  (the "baby"). Here is what mine looked like after the two weeks. 

Take out both the new and the old SCOBYs from the team and put them in a glass or plastic container with enough of the kombucha liquid that you just made, to make another batch of kombucha at another time.  Now, this is where this gets fun… for every batch of kombucha you make, you will make a new scoby. So you started with one, and one grew in the brew you just made, so now you have two SCOBYs. This means you now can make two batches on the next brew - and so on and so on, for each jar you have going. At one point I ended up with 18 SCOBYs at the end of a brew because I had two in each jar because I had big and little jars going all at the same time!

Remember, you need to save 1/2 cup of liquid per SCOBY to make new qt batches. Once you have enough starter liquid and SCOBYs, you can move up from qt jars to 1/2 gallon jars if you wish (just adjust the measurements for the 1/2 gallon size jars - you will calculate all of the ingredients for this size jar including the starter liquid but you will only need 1 SCOBY no matter what the size of the jar is). It may take you a few brews to get to this point, but be patient… it happens pretty quickly once the SCOBYs and liquid start piling up. This is what people call a "SCOBY Hotel". Put a lid on the container and put it in the refrigerator until you are ready to brew again! 

Now for the bottling part. You will need a jar with a lid and a funnel.  These are the types of jars I use. 


You are probably like "she said no metal from that point on and that lid has metal". While that is true, the inner part of the lid is lined with silicone and therefore, the metal will not touch the kombucha :) The top bottle is an glass milk jar from a previous milk purchase - I decided to lose my deposit on the jar because it would make a great kombucha bottle. 

Put the funnel into the bottle and slowly pour in your kombucha. If you pour too quickly you will make a foamy overflow mess because there is some carbonation in the kombucha. Put the lid on and store it in the refrigerator! If you aren't going to have some 'bucha for a few days, open the lid and put it back on - you don't want too much pressure to build up in the jar because it could explode (this never happened to me but i've heard it can). 

And thats pretty much all she wrote. When you are ready to drink, pour it into a glass and enjoy it.  Some sediment on the bottom of the bottle is normal (there may also be stringy little bits floating around) - because its kind of gross to drink, even though it is harmless, put a plastic (or glass - no metal) fine strainer (some people use cheese cloth) over the top of the drinking glass and pour the kombucha over it to eliminate some of the sediment and enjoy!!


Just a few notes:
  • How do you have a continuously supply? Once I bottle a batch I immediately start the process over again this way we continuously have kombucha to drink. If you wait until you drink all of the kombucha to brew again, you are going to be kombucha-less for two weeks while you are waiting for the new batch to ferment and you will be sad :(
  • Why do we brew 3 gallons at a time? Well there are 3 of us drinking it (8-10 oz per day) everyday for two weeks while the next batch is brewing, so we have to make a ton of it to get us through the two weeks. Also, we like sharing/ bartering it with some of our friends so we need extra for that on occasion. 
  • Why no flavored teas?  Well often times the flavored teas do not allow for fermentation to happen properly because of oils and artificial flavorings. Some people do use flavored teas and have it work well for them but I don't feel too comfortable doing it so I stay away.
  • Can I flavor it? Yes you can, its called the second fermentation  process and there are many videos on this on YouTube for you to check out.  In our house, we don't bother since we love the plain kombucha we brew. 
  • Why no metal after you add the starter liquid?  The metal creates a reaction and alters the fermentation process - not a good thing.
  • What if I am scared to brew my own? If you are scared to brew your own - health food stores sell it pre-bottled. Although it is expensive, it is mighty tasty!
  • Isn't that a lot of sugar? Well yes, to start with, but the sugar content decreases during the fermentation process so its not as sugary as you would think.
  • Where did I get my first SCOBY? I didn't have any friends that were brewing their own so I had to buy mine online.  I did some researching and found that Savvy Teas and Herbs had organic SCOBYs and had quite a great reputation. This is what I started out with. Also, Kombucha Brooklyn is another company I've heard great things about. I am a firm believer in not using the dehydrated SCOBYs that are out there!
Well thats pretty much it.  It may sound scary to brew our own but I have to tell you…my experiences have been great, with no problems, and gave me the ability to make 1 gallon of kombucha for about $4 (it is cheaper if you don't use organic ingredients) compared to spending $4 for a 12oz bottle! I did do a lot of research and YouTube video watching (reputable brewers of course) before I started making my own but thats just the way I am.

If you give it a try, let me know in the comments below. Also, feel free to comment with any questions and I will try to answer them the best I can. 

Happy 'bucha brewing!
Danielle

Disclaimer: As mentioned before, since there have been cautions against brewing your own, this recipe is to be made at your own discretion and I am not liable for any adverse outcomes that can come of brewing your own! Also, I am not sponsored by any of the brands/companies mentioned in this posting.  These are companies that I have used in the past and are those that I prefer. Always consult with your doctor before taking. 

Tuesday, January 27, 2015

Elderberry Cold and Flu Syrup

It's no surprise, cold and flu season is in full swing and its been one heck of a season thus far! It is only natural, that during the cold and flu season, I post about elderberries, ginger, cinnamon, cloves, and honey in my Elderberry Cold and Flu Syrup

Elderberries are filled with vitamins C and A, beta carotene, iron, and potassium. These little berries are immune-enhancing and antiviral, which make them great for warding off colds or the flu, and upper respiratory symptoms. Ut-oh be sure to only consume cooked, fully ripened berries as the berries and stems can be toxic! Always get your supply from a reputable source.

Ginger is an herb that many people are familiar with but sometimes over look it's healing properties. Ginger has been shown to reduce inflammation and works as a decongestant!

The same goes for cinnamon - most people use it for cooking but may not know it has antiviral, antiseptic, and antifungal properties, as well as aids with congestion. Word to the wise - cinnamon can stimulate the uterus and should not be used during pregnancy! Who knew?!

Cloves aren't just for baking! Like the above mentioned herbs, they have antiseptic, antispasmodic and antifungal properties!

Lastly, many of you may have been given a spoonful of honey as a child, by your parents or grandparents, to help stop a tickling cough. Although the thickness is wonderful at creating a nice coating on you throat (and it tastes fantastic) it too, has antiviral and antifungal properties (see where we are going here?!). Although many think honey is harmless, it should never be given to children under one year of age!

So now that we know all of the good stuff about the ingredients in the Elderberry Cold and Flu Syrup, lets get to the recipe!

You will need:
1/2 cup dried elderberries or 1 cup frozen berries
1 cup honey (I prefer raw honey but regular will do too)
5 cloves
1 tbsp fresh grated ginger or 1 tsp ginger powder
1 cinnamon stick or 1/2 tsp cinnamon powder
2 cups filtered water
a fine mesh strainer (or cheese cloth)
jars for storage

To make:

In a small pot, add elderberries, cloves, cinnamon, ginger, and water. If you can not find dried elderberries, i've been told that health food stores sell elderberries in the frozen foods department with all of the other frozen fruit. I get my dried elderberries from Mountain Rose Herbs (I LOVE LOVE LOVE this company!)


Once everything is added to the pot, you are going to want to bring it to a boil. Once boiling, cover with a lid, reduce to a simmer for 20 minutes or until it is cooked down to half of the liquid you started with (it could be sooner or longer depending on your simmer-age).


In the bottom picture above, you will see that I cooked mine down a little more than half way - I am bad at estimating. While the ingredients were simmering, every now and again take your wooden spoon and smash the berries. Don't worry about trying to make sure you smash all of them, just a little squish here and a little squish there will suffice (you don't even have to do this if you don't want to - it just made me feel like I was helping them do their job).

So once you determine what half of the liquid looks like, take your strainer (or cheese cloth) and place it over a bowl. Gently, and I mean gently (this will stain if it splatters) pour the ingredients through the strainer - take the wooden spoon and gently press the berries while they are in the strainer to make sure you get all of the juice out of them. Discard them (or compost them if you have a compost heap) when you can't squeeze out any more juice.  Repeat this until the pot is empty.  I then take my liquid and strain it again into another bowl because you want to make sure that there weren't any little bits that were able to sneak through the strainer. 

Now comes time to add the honey. If you are thinking to yourself, "why didn't we add the honey before?" well thats because you do not want the boiling process to cook out all of the goodness from the honey. Before you add the honey, test the liquid to make sure that it isn't hot - you want it to be warm or cool (110 degrees F or lower if you want to get technical) before adding the honey in. Once the liquid is ready, pour in the honey and use a spatula to gently mix it in.

Keep stirring until you feel like all of the honey has been completely mixed in. It took me about 2 minutes to get to this stage. At this point you are probably thinking you did something wrong because this isn't as syrupy as you thought it would be… well you didn't do any thing wrong, this is supposed to be a thinner syrup! Now you can pour your finished syrup into any type of bottle you choose.  Since I have a self-admitted obsession with mason jars, that is what I used.  

I ended up with 1 2/3 cups of syrup when I was done… I divided it into two mason jars. You may have less or more, depending on that whole simmering down process. You should not end up with more than 2 cups because if it is more, you didn't cook down the liquid enough. No big deal though, your syrup just may not be as potent but it is still useable!

Just a few notes:

  • This must be refrigerated! It should store in the refrigerator for a few months. If it smells differently from when it was first made, toss it!
  • Children under 1 year of age should not consume this because of the honey.
  • How much to take? Well, there really isn't a dosage since these herbs are not harmful but it has been widely recommended to take 1 tbsp per day for immune support for adults and 1 tsp for children. For active symptoms, this can be repeated about every 3 hours until the symptoms lessen or resolve completely. 
  • Disclaimer - always consult your health care provider prior to using (both pregnant and non-pregnant readers)
Stay happy and healthy!
Danielle

Reference
Gladstar, R. (2012). Rosemary Gladstar's medicinal herbs. North Adams, MA: Storey Publishing. 

Saturday, January 24, 2015

Peppermint Patty Lip Balm

Although a nice soothing lip balm is a cold weather necessity, if you are like me, it is a year round addiction! For many years, I was a lover of all different types of lip balms (Chapstik brand, E.O.S., and Carmex were with me at all times).  Over the past two years, I have really began to look at the ingredients in the products I was using, especially my lip balms - hello petroleum jelly! Yea…. when I looked at the products I was using on my lips, I realized that 98% of them contained petroleum jelly. Now  I know you are probably thinking to yourself… whats so wrong with that? Well here is why I don't really care for it - its a by-product of making gasoline! I don't know about you but I don't want that anywhere near my mouth, regardless of whether or not  the "bad stuff" is removed, as many companies claim. So the second reason is that people have the misconception that they are sealing in the moisture when they apply petroleum jelly products to their skin but the misfortune is that you are also blocking moisture from getting in and creating a barrier in which you skin can't breathe - might as well put plastic wrap on your lips and call it a day.

So all of this nonsense about petroleum jelly lead me to look for better alternatives, such as Burt's Bees.  I have been of a lover of both bees, and Burt (and Ernie -hehe) from like birth. Naturally, I fell in love with Burt's Bees products, especially their lip balms because they are made with natural products. I mean hell, I love Burt's Bees products so much I even watched the documentary on Netflix (nerd, I know, but it was actually really good). 

So anyway, fast forward to this past year and I have been constantly thinking of ways to DIY everything under the sun, including all of my favorite beauty and skin care products.  This is where the idea for making my own lip balm came in. I thought about it and figured why spend $3.50 per tube of Burt's Bees (I literally have lip balms all over the place so this number is like times 10) when I can make my own for a fraction, yes fraction of the price. 

If you are thinking to yourself… "girl (or boy) you are out of your mind thinking you can make a lip balm just as good as Burt's Bees" well think again Tonto - it's super easy and takes less than 30 minutes. 

You will need:

a double boiler (i'll tell you how I make mine)
1 tbsp of Cocoa Butter (I use it in wafer form)
1 tbsp of Beeswax (I use it in pastilles form)
1 tbsp of Coconut Oil
6 empty 0.15 oz lip balm tubes with lids
20 drops of Peppermint Essential Oil (not fragrance or flavoring - there is a big difference)
a wooden skewer

To make:

Get your double boiler ready. Fill the bottom pot 1/3 of the way with water or enough water so that it won't touch the top bowl when boiling.  If you do not have an official double boiler, do what I do - take a small sauce pot and find a bowl that will sit inside of it, just a little. For me, the bowl I use is a pyrex (make sure it is a glass or ceramic bowl). You will see my setup in the pictures below. Start to boil your water and once boiling, turn it down to a very gentle boil.

Also, this is a good time to get your pouring area and tubes ready.  For this, take a piece of wax or parchment paper (for easy clean up in case you are messy) and line up your empty tubes. You will see in the picture below, I put all of my tubes in a two piece lid from a ball jar just so they are all in one little spot - you do not have to do this, it is just my preference - you can use something else that is small and flat to line them up on.

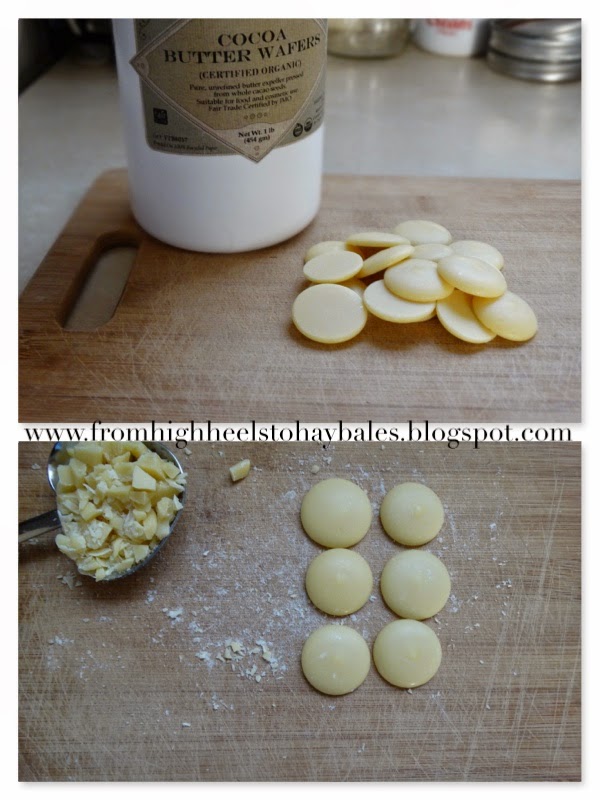
Next, if you are using cocoa butter wafers like I use, you are going to want to cut them up into pieces the same size as the beeswax pastilles (if you are using them). To make measuring easy and avoid using a kitchen scale, we use measuring spoons and not ounces like many recipes. You will need to measure out 1 tbsp of chopped cocoa butter.  It is super important that the cocoa butter and beeswax pieces are the same size!  Your cocoa butter should look like this.
Now measure out your beeswax pastilles.  If you aren't using pastilles, chop up your hunk of wax to be the same size as your chopped cocoa butter. 
Now, add your coconut oil - 1 TBSP worth.  If you haven't caught on already, we are doing a 1:1:1 ratio of the three ingredients… It makes for the perfect consistency!
To make things easier, I dump my ingredients into two-piece Ball jar lids for easy slide-off-ness (!?!?).  You can do what you feel most comfortable doing.

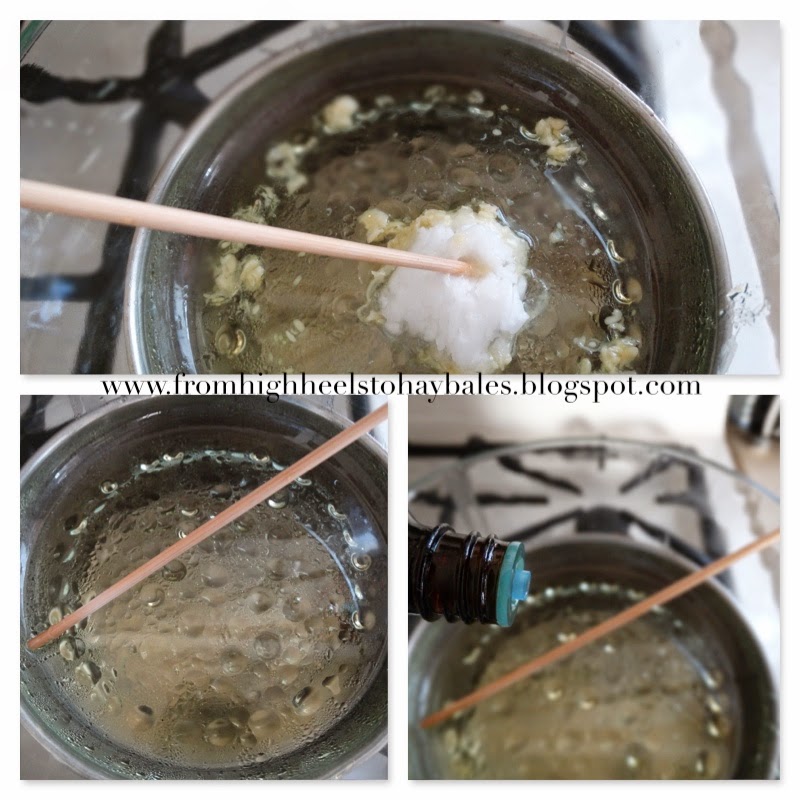
So now that your pot is boiling, start to add the ingredients into the top portion of the double boiler like this. I add the coconut oil last.
Watch carefully because these little guys melt quickly! You are going to want to grab your wooden skewer and start stirring, continuously. The reason I use a wooden skewer is so that cleanup is easier - just throw the darn thing away rather than having to wash another spoon. Once all the ingredients are melted, you are going to want to add the peppermint essential oil.  You should have something like this.
Now comes the tricky part… filling the tubes and not making a mess! Turn off the heat and move your bowl close to where you will be filling the tubes. Careful - this liquid is HOT! Take a small spoon (I use those heart shaped measuring spoons in the pictures above because the bottom of the heart serves as a spout of sorts) and spoon in the liquid into the tubes, filling them to the point where they are about to overflow. You will want to fill rather quickly because the liquid will start to solidify - but no worries, if it does solidify or thicken, just put it back on the double boiler and melt it back down. Also, don't worry about wiping up spills on the tubes, you can fix that once they are completely cooled. If you measured your ingredients correctly, you will have just enough for 6 of the 0.15 oz tubes (these tubes are the common lip balm tube size). 
Some people recommend doing the spoon test - you put a few drops of the melted liquid onto the back of the spoon and put it into the freezer for 3 minutes to see if it is the right consistency.  If you follow my measurements, you do not need to do this step since we know it will solidify to the right texture (trust me on this).

Once they are all filled, give the Ball jar lid (or whatever you have them on) a little, very little, shake/tap to make sure that all of the air has escaped.

While the ingredients are still liquid in the bowl of the double boiler and the spoon, take a dry paper towel and wipe the liquid out of the bowl and off of the spoon. You want to make sure that you get as much of the residue out of the bowl before washing - it will solidify in your sink pipe and you will hate yourself for not doing this step!

Now back to the lip balms… you should not move them, touch them, or even look at them for at least 2 hours - fight the temptation!  Once they are completely cooled, the color will go from transparent to opaque and should be a nice off-white color. Now, it is time to put the lid on and clean up any drips that are on the outside of the tubes.  To do this, take a dry paper towel and rub it on the outside of the tube - you may need to use your nail in some cases. You can either leave them label-less or make your own cute label and slap it on! For me, there is something special about handwriting the label for things you hand make, right? 

So here is the final product - it feels amazing on the lips and smells so good you will want to eat it (and you could if you really wanted to because all of the ingredients are food grade safe - exciting, I know)!
Just a few notes:

  • There are many different ways to make balms depending on the texture you like.  For me, I like a semi-firm yet creamy texture. This recipe will give you that kind of finished  product. If you like a very firm balm, increase the amount of beeswax and decrease the amount of coconut oil and vice versa if you like a really soft balm.
  • If you are not keen on peppermint, you can use other essential oils - I think orange would be lovely and will be in my next batch… I'm thinking of calling it Creamsicle or something like that. 
  • If you do not want to buy tubes, no worries, just save any small containers that you come across. This recipe makes about 1 fl. oz. worth of product so just go from there. Hey, if you use up a tin or little pot of lip balm, clean it out and put the one you make in there! Reduce, reuse, recycle (my mantra)!
  • I bet you want to know what the cost was per tube, don'tcha? Well it was $0.15 per tube!! And, to make it even better, I used all organic ingredients (except for the essential oils) so that means if you do not care organic vs. non-organic, you can make this even cheaper! Yea, I know, it's like the heavens started singing when you heard that!
And that my friends, is all for now! If you give it a try, please comment below and let me know how yours turned out!

Happy lip balm'ing!

Danielle

Saturday, January 17, 2015

No need to Knead….Bread

Growing up as a child, I was no stranger to delicious bread - not the white bread you buy in the grocery store (does that even count as bread?!) but either homemade bread made by my mother or bread from one of the many Italian bakeries near my home. I joke about it now, as an adult, but it's a true story…I barely had grocery store-bought bread, seriously! Anyhow, I attribute my long-time love affair with bread to what I was exposed to as a child. Oddly enough, as an adult I developed a bad relationship with gluten (i'm super sensitive to it) but that doesn't always stop me from eating (or drinking) some on occasion. 

So as some of you may know, this Fall, I took a class at Midsummer Farm in Warwick, NY where I learned about growing herbs, using them in everyday life, and how to make homemade products and recipes with them. Although there are no herbs in the bread recipe I will be sharing today, Barbara (the instructor of the class and my idol) made this recipe (from NY Times) to accompany a delicious lunch that was based around the different herbs in that day's coursework.  Since it was beyond amazing (yes, I had a small piece) I decided to share it with you as I was preparing it to eat with my chicken soup recipe, shared in last week's post. 

If you were (or are) intimidated by the very though of making homemade bread, don't be…this is one hell-of-a way to get started. It's super easy, absolutely scrumptious, and requires 4 simple ingredients! The beauty of this recipe is that, unlike other bread recipes that require long periods of kneading the dough, this one is a "no-knead" dough! However, the only downfall of it is the fact that you have to start it the day before you want to eat it - but thats okay because the actually "hands on" portion of the recipe is less than an hour including cooking time!

Here goes!

You will need:

  • a Dutch oven (ceramic, Pyrex, or cast iron). They recommend 6 qt but mine was a 2 qt and  was perfect.
  • mixing bowl and wooden spoon
  • plastic wrap
  • 2 cotton tea towels (any cotton towel will do as long as it is NOT terry cloth)
  • 3 cups all purpose flour (and more for dusting… a lot of dusting)
  • 1/4 tsp active yeast 
  • 1 1/4 tsp salt
  • 1 5/8 cups water (i'll get into this dumb measurement later on)


To make:

Take the flour, yeast, and salt and mix it together in a bowl so that all ingredients are well combined. On the package of yeast, they talk some nonsense about dissolving it in water first - hogwash! There is no need to do this for this recipe. 

Next you want to add the 1 5/8 cups of water.

I mean come on… 5/8 cup… who does that?! I was looking, perplexed, at all of the measuring devices in the house, just praying that one would have a 5/8 cup mark on it and you know what - the lights were on but nobody was home! Using my college degree(s), I used a mathematical formula, from memory, and figured out that 5/8 of a cup is actually 1/2 cup plus 2 tbsp! Ok maybe I stretched the truth a little…ok, I flat out lied! I did not do any math to figure this out (what do I look like, Einstein) I used this measurement converter that is a life saver! 

So at this point you should have this going on in your mixing bowl.


And now we stir… and stir… until you "form some sort of paste" (F.r.i.e.n.d.s. reference, I couldn't help myself). No, but really - it gets thick and sticky! Make sure that everything is mixed well and there are no dry bits lingering about the bowl. Once it is mixed well you successfully made your dough (in a sense) and you will want to cover it with plastic wrap like this.


Now comes the long part… waiting 18 hours, yes I said 18 hours, for it to do its magic. While the dough is "working" you want to keep it in a warm location (at about 70 degrees). Since my kitchen is downstairs and we lower the heat during the night, I brought the dough to bed with me... well not really to bed but in my bedroom where it was at least 70 degrees throughout the night. As the dough is doing it's thang… you will get this wonderful yeasty aroma if you get close to it and take a whiff!  

So after 18 hours, remove the plastic wrap and check out your dough. It should be bubbly and filled with nice little air pockets like this. 


Sorta resembles the inside of a loaf of bread, doesn't it?! 

Now you are going to need to get out your cotton tea towels. In our house we use a dough board instead of rolling dough out on our counter or kitchen table- you can do whatever you are used to.  Flour the work surface with just enough flour so that the super-sticky dough does not stick.


Now dust your hands with flour (ok maybe its more like coating them really, really, really well) so that you can work with the dough.  WARNING: it's like glue! Start by pulling the dough away from the sides of the bowl and forming it into a blobby ball, of sorts. Then plop it (literally it will make a "plop" sound) onto the work surface and dust it with flour like this.


Kind of work it into some sort of round object, as best you can… it is going to try to move into its own shape so just go with it. Once you have a decent dusting of flour on it, it should not be so sticky any more. 

You are going to want to fold the dough over itself once (like folding it in half) and then fold it again in the opposite direction like this.


Pay attention to the seams - they actually serve a purpose believe it or not! They are important in the next few steps.

Move the dough to the side and take one of the cotton towels. Lay it flat on the work surface and give that a nice dusting of flour, not too much and not too little (we are doing a lot of flour dusting, this I know). Pick up your dough and put it seam side down onto the cotton towel. In the picture below, I am pointing to what the seam-side looks like incase you have no idea what I am talking about.  You should have a pretty, smooth-topped ball of dough like this. 


Now, lightly dust the smooth side of the dough ball with flour and cover with the other cotton tea towel.  Leave it sit for 2 more hours.

About 30 minutes before the two hours is up, you will want to preheat your oven to 450 degrees and put your Dutch oven, and lid, in the oven to warm up (yes, I know it is empty but just go with it). Make sure to put an oven rack at mid-height since thats where we want to bake this little baby.

After two hours is up, remove the top towel. Take your finger and give your dough a little poke with your finger… it should leave a mark if it is ready.  If the dough quickly springs back, leave it for another half hour and check back with another poke.  Mine was just perfect at the two hour mark. See the picture below.


Remove your Dutch oven from the oven and be careful not to burn yourself… I'm not speaking for experience or anything like that, and place it on a pot holder next to your work surface.  Slip you hand underneath the the tea towel and under your dough ball. Gently, flip your dough ball into the hot Dutch oven so that the towel (seam side) is up. Slowly pull the tea towel off of the dough ball like this.


It may be a little hard to see in the picture, but my seam side is now facing up.  This will make a beautiful ridge in your final loaf. I promise, it will look as though it was bought at a real shee-shee bakery.  Dust (yes, again) the top of the dough with a little more flour (this is the last time I will say this, PROMISE). If your dough is looking a bit on the wonky side (in shape that is), give the Dutch oven a shimmy-shake to even things out a bit. Mine was off kilter but I kind of wanted that, homemade, rustic kind of look.

Put the lid onto the Dutch oven and put it in the oven, on the middle rack, for 30 minutes.


After 30 minutes of baking, your loaf (now we will call it a loaf instead of dough ball) will be a very, very light golden color. Take the lid off (careful not to burn yourself again, ahem!), and bake for 15 more minutes. In the pictures below, the top picture is the golden color you are looking for after 30 minutes.  Keep an eye on the loaf during the last 15 minutes because this little guy will turn brown quickly while the lid is off!!


Once you have a nicely browned loaf, remove it from the oven. Take pot holders and lift the loaf out of the Dutch oven and place it onto a wire rack to cool. The beauty of this loaf is the fact that it literally does not stick, whatsoever, to the Dutch oven… I was amazed when I realized I didn't need a spatula to unstick it from the bottom! 


And that's it! When you are ready to eat, give it a slicing and enjoy! You can spread some butter on it, dip it in herb-infused olive oil (future post), or any other way you would typically enjoy a really crusty loaf of bread. 

We ate ours warm, practically right out of the oven, and let me tell you… it is hard to stop yourself from eating the whole darn thing (yourself).

It may seem like "oh my gosh, she thinks this is easy!?!" but I tell you… it really is super easy.  There truly is no comparison of store bought bread compared to the homemade thing!

Give it a try and let me know how it went in the comments below!

I intend on making this loaf again and incorporating some herbs, or maybe some kalamata olives (olive bread is my all time favorite).  When I do, I will be sure to post about it.

Enjoy!
Danielle

Saturday, January 10, 2015

Homemade Chicken Soup (Super-duper Chicken-Souper!)

Since I was a little girl, I always looked forward to Winter and my mom's delicious chicken soup.  I swear, I thought that everyone had chicken soup like this in their house until I got old enough to realize that in some homes, chicken soup was the stuff from the can!  Today, I made a huge pot, just like my mom taught me, and I must say… it is worth the effort. The can business just simply does not compare. 

Before we get into making it, lets talk a bit about chicken soup's reputation. So it is commonly know that it is one of THE BEST medicines for times when you are feeling "under the weather". What many people do not realize is how hearty and nutritious, if made like this, chicken soup can be - it's a complete meal! The slow and gentle boil of the chicken and veggies provide you with a protein and vitamin packed, super-duper (yeah I just said that), cold kicking', good for your soul meal. I bet you can picture it in your mind! 

So the prep-time for the soup is about 10 minutes before it's cooked and 10 minutes after, for shredding the chicken, and the boil time in-between that is 2 hours… so in a nut shell, for 20 minutes of prep and 2 hours of an occasional stirring, you can make one hell-of-a soup. Here goes-

You will need:
a large pot
1 whole chicken (a 6 pounder will do)
water
3 parsnips
4 carrots
1 small onion
4 ribs of celery
5 red bliss potatoes
3 small turnips (or one large)
salt 
pepper
parsley (fresh or dried)

To make:

Fill your large pot with water to about 1/2 - 2/3 way full and start to boil it while you rinse the chicken.  **Make sure to remove the sack-o-guts (I can vomit just thinking about it) because a good friend of mine cooked a whole chicken with them still inside - true story!


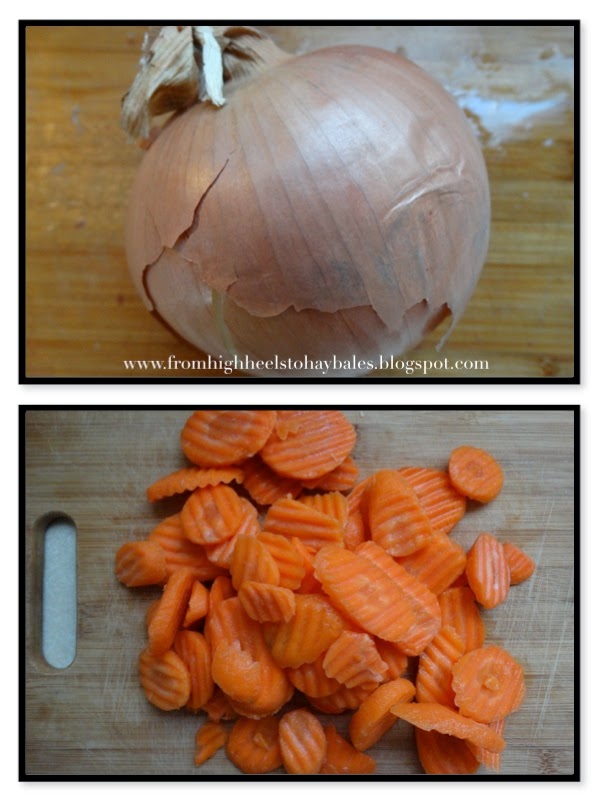
So while your chicken is taking a swim and the water is warming up, its time for the "chopping of the veg".  I cut all of my veggies to about 1/4" thickness except for the carrots and onion. The carrots are sliced thinly and the onion should be coarsely chopped.

These beauties are parsnips…they look like white carrots and do you know what? They taste kind of like them too, that is with a little hint of a parsley. They are high in fiber, vitamin C, folic acid, manganese, and copper, have a similar nutritional value to potatoes, but are lower in calories.


Speaking of potatoes…they are a good source of potassium, vitamins B6 and C, and niacin. It is important to leave the skins on your little potato cowboys (just give them a good scrubbin') because that's were most of the nutrients are packed.


On to the celery. For some reason, of which I do not understand, people think celery is not that nutritionally important! Oddly enough, it is a very, very good source of vitamin C and fiber, and a great source of B vitamins. From an herbal standpoint (yes its considered an herb by some) it contains coumarin compounds which have been know to aid in cancer prevention, lower blood pressure (studied by the University of Chicago Medical Center) and help relieve migraines! Woohoo for Celery!!


Next you want to work on the turnips. Never seen or heard of a turnip? It's another root veggie that I absolutely love. Although they are a "starchy" vegetable, they contain less calories than potatoes and are an outstanding source of fiber, vitamin C, folic acid, and copper.  


Are you starting to see why chicken soup is so good for helping heal from colds?  All of these veggies are super charged with vitamins, especially Vitamin C, which is a common addition to everyone's cold regimen!

So lastly we have the onion and carrots. Onions, too, are full of vitamins C, B1, K, and B6, biotin, folic acid, and fiber.  There have been numerous publications wherein onions have been found to lower blood lipid levels, prevent clot formation, and lower blood pressure.  Carrots on the other hand, have the most vitamin A out of any other vegetable. They are an excellent antioxidant which can help prevent cancer and cardiovascular disease. More commonly known, they are great for your eyes.


Okay. So now that we got all of the chopping out of the way (along with a mini-nutrition lesson), toss it into the pot with your chubby little chicken. Season with salt, pepper, and parsley to taste. I use about 1 tsp of fresh ground pepper, 1/2 tbsp of fresh ground kosher salt, and 1/2 tbsp of parsley (I used dried). 

Speaking of parsley, it is a great antioxidant and is a warrior in the digestive and urinary tracts. Don't worry if you feel like this isn't enough seasoning… I always add additional seasoning to my serving since everyone has a different preference on the strength of seasoning in their food.


Pretty isn't it?  So that's it for round one of the prep. By now, the water should be boiling - turn it down to a gentle boil, cover with the lid propped open and leave for two hours. Give it  a little stir every now and again.  Don't be surprise when you go to stir one of the times and your chicken is floating like he is on a pool raft - this is what he is supposed to do!

So after two hours, your chicken will be fully cooked and pretty much fall off of the bone. Very (and I mean very) carefully take your chicken out of the pot and place on a platter. Remove the skin (I'm gagging again) and remove all of the chicken meat from the bones. Make sure to be cautious of the little bones - you don't want to choke and bite the big one… you want to be around to enjoy the soup, ya know?! 

Once it is off of the bone, you can either keep the bones and make a stock for use in the future or toss them in the garbage-io. Now take two forks and shred the chicken into pieces like the picture below. Before you add it back to the pot, fish around in the soup to make sure you didn't lose a wind or a leg in there. When you are sure, add the shredded chicken back to the pot and give it a good ole' stirrin'. 


Now its time for serving… if you like, you can add some cooked pasta (we use ditalini) or some cooked rice. I also top mine with some grated cheese (it's amazing).


And there you go - hearty, vitamin packed, homemade chicken soup with a ton more nutrients, a fraction of the salt, and a none of the preservatives of the canned stuff.  

Enjoy!
Danielle

References 
Hartung, T. (2011). Homegrown herbs. North Adams, MA: Storey Publishing
Murrary, M., Pizzorno, J., & Pizzorno, L. (2005). The encyclopedia of healing foods.  New    York, NY: Atra Books.